Migrating standalone algorithms to HERDOS
This page describes how to miagrate existing standalone data processing algorithms to HERDOS.
Decide where to put your code.
The entire HERDOS is composed of many packages, wich each package implementing some independent functionalities or part of the offline data processing tasks. For example, RandomSvc implements a service configuring random engine and providing random numbers. FITCluster implements the clusering algorithm for FIT.
The current directory structure of HERDOS is listed as below. Please find the best place to fit in your code. For example, if you are working on the reconstruction algorithm of the calorimeter, please create your package under the Reconstruction folder.
cmake: CMake policies of HERDOS. Should not host any packages.
CommonSvc: Some common service and tools for the offline data processing, such as RandomSvc and handles random number, and JobInfoSvc that handles the job meta-data.
Database: Services that handle the connection or ingestion of the offline database.
DataManagement: Event data management services such as the transient data store and the data input/output services.
DataModel: Definitions of the event data model
Digitization: Holds all algorithms that perform the digitization
Documentation: Holds documentations of HERDOS system
Examples: Example code of HERDOS
Geometry: Definition of the detector geometry data, and services that provide geometry information for other applications
HerdUtil: Some common utilities such as jMonitor, and other command-line tools.
installation: The automated installer of HERDOS
Reconstruction: Holds all reconstruction algorithms.
Simulation: Holds all pakcages for the detector simulation
Create your package
The typical detectory structure of a HERDOS package is as follows:
CMakeList.txt in the Package directory and defines all the building tools
/: header files to be exported: *.hh (triditionally in include dir) src/: implementation files: *.cc
python/: exported python package (for sniper): *.py
scripts/: python scripts for running and testing
Some cmake functions and policies are defined in HERDOS for developers to develop their packages. To include your package in the compile chain of HERDOS, define your CMakeList.txt with the herd_add_pkg function.
herd_add_pkg(your_package_name
             DEPENDS PodioDataSvc EventDataModel
)
The package name should be in pascal case as HERDOSˇŻs naming convention (e.g.: DetectorSimulation or DetSim). If your package relies on other packages, append the dependicies after the DEPENDS command (for example, if you need to read/write event data, PodioDataSvc and EventDataModel must be relied). Also, donˇŻt forget to include your package in the CMakeList.txt in the upper level directory, for example:
set( subdirs HelloWorld HelloHist HelloTree your_package_name)

foreach(dir ${subdirs})
  add_subdirectory(${dir})
endforeach()
The python folder is used to export the python modules. To make your package available in python scripts, put the following content in python/your_package_name.py
import Sniper
Sniper.loadDll("libXXX.so") # XXX is your package name
del Sniper
After this is done, your package will be exported to python, so that you could run import your_package_name to import your libraries in python.
Migrate your code to SNiPER
Create your algorithm
In HERDOS, the basic execution unit is Algorithm, where the specifc data processing algorithms are performed. So the bulk of the migration work is to migrate your code to SNiPER algorithm(s).
To develop a SNiPER Algorithm, derive from the AlgBase class. The following shows an example:
#pragma once

#include "SniperKernel/AlgBase.h"
#include <string>
#include "TH1D.h"

class TestAlg : public AlgBase
{
    public:

	TestAlg(const std::string& name);
	virtual ~TestAlg();

	virtual bool initialize();
	virtual bool execute();
	virtual bool finalize();

    private:
        TH1D* hist_edep;
};
In a SNiPER Algorithm, becides the standard constructor and destructor, three member functions are mandatory:
initialize(): SNiPER will call initialize() before the run starts. Actions like creating histograms, connecting database, opening files could be placed here.
finalize(): SNiPER will call finalize() after the run stops. Actions like saving histograms or TTrees, closing files could be placed here.
execute(): SNiPER will call execute() once for each event during data processing, the main body of your algorithm should be placed here.
In the following example, the TestAlg does the simple job of reading simulated SCD and calorimeter hits from the event store, and filling a histogram. To note that, the DECLARE_ALGORITHM macro is mandotory, so that the Algorithm could be dynamically loaded by SNiPER using its class name.
#include "TestAlg.h"
#include "SniperKernel/AlgFactory.h"
#include "SniperKernel/SniperPtr.h"
#include "EventDataModel/TrackingSimHitCollection.h"
#include "EventDataModel/CaloSimCellCollection.h"
#include "RootWriter/RootWriter.h"
using namespace edm;

DECLARE_ALGORITHM(TestAlg);

TestAlg::TestAlg(const std::string& name)
: AlgBase(name)
{ }

TestAlgAlg::~TestAlgAlg()
{ }

bool TestAlg::initialize()
{
    hist_edep = new TH1D("hist_edep","hist_edep",50,0,0.2);
    return true;
}

bool TestAlg::execute()
{
    auto TrackSimHits = getROColl(TrackingSimHitCollection, "scdhits");
    auto CaloSimHits = getROColl(CaloSimCellCollection, "calohits");

    if (TrackSimHits) {
        // Do some analysis here.
    }
    if (CaloSimHits) {
        for (size_t i=0; i<CaloSimHits->size(); ++i) {
            auto edep = CaloSimHits->at(i).getEdep();
            hist_edep->Fill(edep);
        }
    }
    return true;
}

bool TestAlg::finalize()
{
    SniperPtr<RootWriter> ws(getParent(), "wSvc");
    if (ws.valid()) {
        ws->attach("Fkey/histDir", hist_edep);
        return true;
    }
    else {
        LogError << "Failed to attach histogram" << std::endl;
        return false;
    }
   return true;
}
Create your Service (optional)
Becides Algorithms, another frequently used SNiPER component is called Service, where some common functionalities (such as common calculationgs of the detector geometry) shared by many algorithms could be encapsuled. A SNiPER Service should be derived from the SvcBase class, and the initialize() and finalize() member funtions are mandatory (called before the run starts and after the run ends by SNiPER, respectively).
The following example shows the Service of generating random numbers for other Algorithms. Similar with the Algorithm, the DECLARE_SERVICE is mandatory.
#pragma once

#include "SniperKernel/SvcBase.h"

class RandomSvc: public SvcBase
{
public:
    RandomSvc(const std::string& name);
    ~RandomSvc();

    bool initialize();
    bool finalize();

    double random();
    long getSeed();
    void setSeed(long seed);
private:
    long m_init_seed;
};
#include "RandomSvc.h"
#include "SniperKernel/SvcFactory.h"
#include "CLHEP/Random/Random.h"
#include "TRandom.h"

DECLARE_SERVICE(RandomSvc);

RandomSvc::RandomSvc(const std::string& name)
    : SvcBase(name)
{
    declProp("Seed", m_init_seed);
}

RandomSvc::~RandomSvc()
{ }

bool RandomSvc::initialize()
{
    setSeed(m_init_seed);
    return true;
}

bool RandomSvc::finalize()
{
    return true;
}

long RandomSvc::getSeed()
{
    return CLHEP::HepRandom::getTheSeed();
}

void RandomSvc::setSeed(long seed)
{
    CLHEP::HepRandom::setTheSeed(seed);
    // Add ROOT support
    gRandom->SetSeed(seed);
}

double RandomSvc::random() {
    return CLHEP::HepRandom::getTheGenerator()->flat();
}
Once the Service is implemented, you could call the Service in your Algorithm via the SniperPtr, as shown below:
#include "SniperKernel/SniperPtr.h"
#include "RandomSvc.h"

void TestAlg::some_useful_function() {
    // The template parameter is the class type of the Service
    // The second parameter of SniperPtr is the Service name defined in python
    SniperPtr<RandomSvc> ws(getParent(), "myRandomSvc");
    if (ws.valid()) {
        ws->setSeed(42);
        double ran = ws->random();
    }
}
The Service must be configured in your python script, as shown below:
import Sniper

task = Sniper.Task("task")

import TestAlg
alg = task.createAlg("TestAlg")

# The Service class name and instance name must be corresponding to the parameter in SniperPtr
import RandomSvc
svc = task.createSvc("RandomSvc/myRandomSvc")

task.setEvtMax(5)
task.run()
Using property to configure your Algorithm or Service
Sometimes itˇŻs nesessary to configure parameters in your Algorithms or Services, and avoid hard-coding (so that you do not have to re-compile the code everytime any parameters are changed). HERDOS allow users to configure free parameters in python, i.e. passing values from python script to C++. This feature is acheieved by defining Property in Algorithms or Services. Currently, HERDOS supports three types of properties, including:
Scalar type such as int, float, string and bool types. Since these types are available in both python and C++, HERDOS will perform the transform directly.
List of scalar types. In python user could define python list of scalar types, such as
[1,1,2,3,5]. While passing to C++, HERDOS will transform the python list to C++std::vectorof corresponding types.Map of scalar types. In python user could define python dictionary of scalar types, such as
{1: 'foo', 2: 'bar'}. While passing to C++, HERDOS will transform the python list to C++std::mapof corresponding types.
To define a property, use the following macro in the constructor of your Algorithm or Service.
RandomSvc::RandomSvc(const std::string& name)
    : SvcBase(name)
{
    // The first parameter is the name of the property.
    // The second parameter is the member variable of RandomSvc
    declProp("Seed", m_init_seed);
}
To configure the property in python:
import RandomSvc
svc = task.createSvc("RandomSvc/myRandomSvc")
# The name of the property must be corresponding
# 42 will be passed to m_init_seed of RandomSvc
svc.property("Seed").set(42)
Handle the event data
Retrieving and saving event data in Algorithms
Usually what an Algorithm does is to read in some event data, does some processing upon them then write the processed data out. In HERDOS all event data is stored in a place called EventStore, which is managed by the PodioDataSvc. The PodioDataSvc could be connected to data input/output services, so that during execution, the data I/O will be automatically handled.
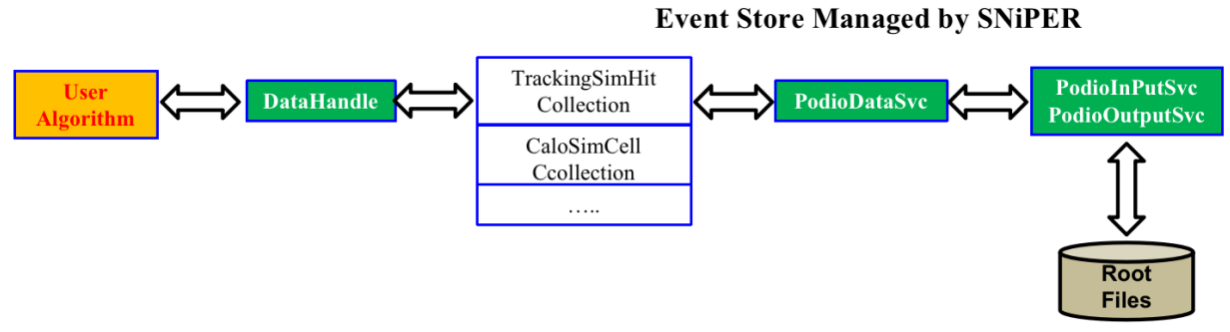
In HERDOS we provided the DataHandle as the interface for retreiving and saving event data. To further simplify the interface, two C++ macros getROColl and getRWColl are defined. The ˇ®getROCollˇŻ gets the data collection from the datastore in read-only mode, and if the collection does not exist, the datastore will try to load it from the input data file. The ˇ®getRWCollˇŻ gets the data collection from the datastore in read-write mode, and if the collection does not exist, the datastore will try to create a new one. This means that HERDOS forbids modifying event data thatˇŻs read from input files.
Please note that the getRWColl and getROColl must be called for each event (in execute()). As the I/O services will delete all collections after each event is processed to avoid memory leak.
The following example shows what a reconstruction algorithm usually does, e.g. reading in simulated hits and writing out reconstructed clusters.
bool CaloShowerAxisPCA::execute()
{
    // Read in the simulated calorimeter hits
    // The first parameter of getROColl is the type of the collection, the second parameter is the name of the collection, which is decided when the collection is created. The name of the collection will be used as the name of the TBranch saving it.
    auto simhits = getROColl(CaloSimCellCollection, "calohits");
    // Loop over the hits
    for (size_t i=0;i<simhits->size();++i) {
        CaloSimCell cell = simhits->at(i);
        // Get information from the cell and do your calculation.
        float energy_deposition = cell.getEdep();
        float first_hit_time = cell.getTfirst();
        // ...
    }

    // Write out the reconstructed shower axis
    auto mAxis = getRWColl(CaloShowerAxisCollection, "caloPCA");
    auto showerAxis = mAxis->create();
    showerAxis.setEntryCoor(10,12,13);
    // ..
}
The datastore and data I/O in HERDOS is implemented in three Services, PodioDataSvc, PodioInputSvc and PodioOutputSvc. You have to configure them in the python script if you want to read/write event data, as shown below.
import Sniper
task = Sniper.Task("task")

import TestAlg
alg = task.createAlg("TestAlg")

# Configure PodioDataSvc
import PodioDataSvc
pSvc = task.createSvc("PodioDataSvc")

# Configure PodioInputSvc and input file(s)
import PodioSvc
Isvc = task.createSvc("PodioInputSvc/InputSvc")
Isvc.property("InputFile").set("simhits.root")

# Configure PodioOutputSvc and input files
Osvc = task.createSvc("PodioOutputSvc/OutputSvc")
Osvc.property("OutputFile").set("calorec.root")

task.setEvtMax(10)
task.run()
Event data model
The format of event data in HERDOS is defined by the event data model (EDM). The HERDOS EDM is developed based on podio (plain-old-data i/o). In the current version of podio, all event data (hits, showers, tracks, clusters etc.) is managed in collections (work similarly as std::vector). The following example shows the usually approaches of accessing collections.
// Creating a collection and put it into the event store.
TrackingSimHitCollection* TrackSimHits = getRWColl(TrackingSimHitCollection, "scdhits");

// Create hits and put hits in the collection
MutableTrackingSimHit hit;
hit.setTrackID(1);
hit.setPdgID(-14);
TrackSimHits->push_back(hit);

// Alternatively
auto another_hit = TrackSimHits->create();
another_hit.setXXX();


// If a hit is not put into a collection, it will be deleted automatically after the scope
{
    MutableTrackingSimHit wild_hit;
    // Auto deletion of wild_hit;
}
// Looping through collections
auto TrackSimHits = getROColl(TrackingSimHitCollection, "scdhits");

// Via iterator
for(auto hit = TrackSimHits.begin(), end = TrackSimHits.end(); hit != end; ++hit) {
    std::cout << hit->getEdep() << std::endl;
}

// Via direct object access
for(size_t i = 0, end = hits.size(), i != end, ++i){
  std::cout << TrackSimHits->at(i).getEdep() << std::endl;
}
Currently, we have defined a number of EDM classes to support the detector simulation, digitization and reconstruction applications. The concreate definitions are placed in a yaml file, offline/DataModel/EventDataModel/datalayout.yaml. Please take a look at these class definitions, and if they donˇŻt satisfy your requirements, please discuss with the HERDOS developers to develop new classes or extend existing ones. (For example, if you are working with calorimeter reconstruction algorithms, please check if you can re-use CaloSimCell, CaloDigiCell, CaloRecoCell, CaloClusters and CaloShowerAxis.)
Detailed introduction of the EDM definition will be introduced in the developer documentation as well.
Note that HERDOS will aotumatically generate C++ code based on the content of datalayout.yaml. This is done during the cmake command (not during the make command). So each time the datalayout.yaml is updated, please re-run the build.sh, or the cmake command.
Handle the detector data
In HERDOS, most of the detector data (geometry etc.) is managed by the GeometrySvc. If you want to make use the GeometrySvc, just configure it in your python script and use SniperPtr to call it in your Algorithm
import GeometrySvc
geosvc = task.createSvc("GeometrySvc")
import os
# Select the geometry to be used
geosvc.property("GeoCompactFileName").set(os.getenv("HERDOS_INSTALL")+"/compact/newdesign/newdesign-v2.xml")
SniperPtr<GeometrySvc> geosvc(this->getParent(), "GeometrySvc");
if (geosvc.invalid()) {
   LogError << "Can not Load GeometrySvc" << std::endl;
}
// Get the dimention of cell 10 of calorimeter
auto volume_size = geosvc->getDimension(GeometrySvc::CALO, 10);
The current available functionalities include getting position, dimention, direction information of a detector volume and transform local/global coordinates etc. These are the frequently used functions of the GeometrySvc:
/*
Get the global coordinates of a given volume.
   Parameters: DD4hep volume ID
   Parameters: sub-detector ID: {CALO,STK,PSD,FIT,SCD,TRD}
   Return Value: dd4hep::Position object (containing x,y,z coordinates)

Example usage:
    auto pos = geosvc->getPosition(GeometrySvc::CALO, 101);
*/
dd4hep::Position getPosition(dd4hep::VolumeID &volid);
dd4hep::Position getPosition(SubDetector systemid, int cellcode);


/*
Get the global coordinates of a given volume.
   Parameters: DD4hep volume ID
   Parameters: sub-detector ID: {CALO,STK,PSD,FIT,SCD,TRD}
   Return Value: std::vector<double> (containing length, width and height)
*/
std::vector<double> getDimension(dd4hep::VolumeID &volid);
std::vector<double> getDimension(SubDetector systemid, int cellcode);

/*
Get the ROOT Physical Node object of a given volume.
   Parameters: DD4hep volume ID
   Return Value: ROOT TGeoPhysicalNode pointer.
*/
TGeoPhysicalNode *getPhyNode(dd4hep::VolumeID &volid);
/* Transform from world coordinates to local ones at giving level
    Parameters: global coordinates of a given point, and the level to be transformed
    Return Value: dd4hep::Position object (the local coordinates)
*/
dd4hep::Position GlobalToLocal(const dd4hep::Position &global, int level=-1);
/* Transform a point from local coordinates of a given level to global coordinates
    Parameters: global coordinates of a given point, volume ID of the local volume, level of the local volume
    Return Value: dd4hep::Position object (the local coordinates)
*/
dd4hep::Position LocalToGlobal(const dd4hep::Position &local, dd4hep::VolumeID &volid, int level=-1);
Compile and test your code
After all the coding work is done. You could run the build_RelWithDebInfo.sh script under offline to compile your package. Please donˇŻt forget to include your package into the upper-level CMakeList.txt if you have placed your package under a sub-folder under offline.
Alternatively, you could also compile the offline mannually, by running:
cd offline
mkdir build && cd build    # We recommend to use out-of-source building strategy.
cmake .. -DCMAKE_INSTALL_PREFIX=../install
make -j 10
make install
source ../build/install/setup.sh
Each time when the code has been modified, you could run:
cd build
make -j 10
make install
To re-compile your code.